In the sweetness of friendship let there be laughter and sharing of pleasures. ~ Gibran

Saturday, November 9, 2013

Hoot Owl PB & Chocolate Cookies for Thanksgiving!


This month's Make&Take was hosted by Pam, and as always she dazzled us with her baking creativity! Are these the cutest cookies ever! Our Halloween Day session was complete with every detail to get us into the Fall spirit! A touch of Halloween and a cookie recipe to carry us through to Thanksgiving!

Hoot Owl Cookies

From Joann's recipes 

1 cup of brown sugar
1 cup of white sugar
3/4 cup of peanut butter
3/4 cup of margarine or butter
Cream the sugars and butters together

Add :
3 eggs (one at a time)
2 teaspoons of vanilla

Blend well.

Add:
4 teaspoons of baking powder
1 1/4 teaspoons  of salt.
4 and 1/2cups of flour
(1 cup of flour at a time)
Mix well and  then make into a ball.

Take off 1/3 off the ball and add 5 tablespoons of cocoa with it to make the chocolate part of the owl.   Blend well.

Roll out the chocolate cookie dough into a log that is 20 inches long.  

Make the vanilla dough into a log and then flatten it out into a 4 inch by 20 inch long rectangle.

Lay the chocolate cookie dough in the center of the vanilla dough and wrap the vanilla dough around the chocolate dough.  Then roll the dough on the counter gentle until it is rounded and smooth.

Cut in  1/8 to 1/4 inch slices.

Take two slices and lay them side by side on cookie sheet.  (place them tightly together).  Pinch the top corners to form the ears of the owl.

You will need a can of cashew nuts to use for the beak of the owl.
Put a cashew in the center of the two cookies to form the beak.

For the owls eyes.  You will need 4 ounces of cream cheese.  I put the cream cheese in a pastry bag and use a # 3 tube to put a dot for the white of the eye.

You will need a bag of chocolate chip for the pupil of the eye.  Place one chocolate chip on the dot of cream cheese and press down gentle.

Bake in preheated oven at 350 degrees for 8-10 minutes.  Remove from heat and cool on rack.

Make 3 dozen.

While we were waiting for the owls to bake up, Pam provided a wonderful Fall lunch. It was Halloween Day so we had black and orange cheese ravioli with her famous pumpkin ragout sauce, delish! Then darling brownie ala mode with chocolate spiders.


These cute little favors are Halloween s'mores. Package 2 graham crackers, 2 small individual snack size Hershey bars, a one darling ghost marshmallow peep on top. The perfect party favor! 


Original recipe makes 4 servings Change Servings
  • 1 tablespoon unsalted butter
  • 3 tablespoons minced sweet onion
  • 1 clove garlic, minced
  • 1 cup chicken broth
  • 1 cup pumpkin puree
  • 2 chipotle peppers in adobo sauce, chopped
  • 1/3 cup low-fat milk
  • 1 teaspoon ground sage
  • 3/4 teaspoon salt
  • 1/4 teaspoon ground coriander
  • 1 pinch ground cinnamon
  • 1 pinch ground nutmeg

Directions

  1. Melt butter in a saucepan over medium heat, and cook and stir the onion and garlic until the onion is translucent, about 3 minutes. Whisk in the chicken broth, and bring to a boil; whisk in the pumpkin puree, chipotle peppers and their sauce, milk, sage, salt, coriander, cinnamon, and nutmeg. Allow sauce to come to a simmer, then lower heat to hold at a simmer until serving time.

Snowman Candy Wraps for Holiday Gifting!


The Make and Take Gals have been busy with underground activities this month. Here is a darling and affordable gift for teachers, neighbors, hostess, or to tuck some cash into for that favorite service person. How about these darling faces poking out from your Christmas socking on Christmas morning?

Supplies List

1. Knit Gloves
2. Hershey’s 4.4 oz. milk chocolate bar
3. Double sided tape
4. Snowman paper wrap
5. Regular scotch tape
6. Ribbon
5/8” for belt
1/8” for bow on “glove” hat
7. Decoration for the front of the belt.
8. Hot glue gun


Instructions
1. Print out snowman paper wrap on a color printer. Trim to 7-1/4” high by
9-1/2” wide, keeping the snowman print in the middle.
2. With regular tape, tape down the corner flaps of the chocolate bar, so that they do not stick up over the “wrap”.
3. Center snowman on chocolate bar, fold and crease edges. Using double sided tape, tape the wrap securely.
4. Put one glove on the snowman’s head. Use a small piece of double stick tape under the front of the glove to hold in place.
5. Tuck second glove in the back of the first glove. Fold glove over from sides so that it does not show from the front.
6. Wrap the 5/8” ribbon around “Snowman” waist. Make sure that the ribbon goes over the back glove to hold it in place. Pull securely and affix in the front with a small dot of hot glue. Be careful not to burn your fingers.
7. Affix the decoration to the front of the belt with a small dot of hot glue.
8. Tie a bow on the glove to make the snowman hat with the 1/8” ribbon. Measure and cut the ribbon. Pull the ribbon taut so that all of the fingers some together to form the hat.
9. HAVE FUN!!! THEY ARE SO EASY AND SO CUTE.

Sunday, September 22, 2013

September Make and Take Warms Up With Jean's Homespun Fall Treats!


 Fall has rolled into Portland with a chilly change to the season. After a deliciously long and hot summer, the brisk pumpkin weather took us by surprise. Our hostess, Jean, however planned for the transition in this month's Make and Take. With her skillful direction we revisited the cozy fleece blanket project and produced a splash of fall color blankets to cover our families in.


In addition we made a festive and beautiful Autumn Nut Bark that is insanely good!


No visit to Jean's house would be complete without testing out some delicious new salad recipes. Lunch was devine! Thank you Jean!

 Recipe can be found at http://www.foodnetwork.com/recipes/bobby-flay/greek-quinoa-salad-recipe/index.html

Thursday, July 18, 2013

Make and Take Gals Magic: Chocolate Covered Oreos with Transfer Designs!


Make and Take was at MJ's place this month. A scorching 85 degree day in Portland and we were able to relax and enjoy the beautiful breeze coming through the window. We caught up with the summer happenings over coconut milk parfaits, then on to a yummy project.


Chocolate covered Oreos with cocobutter design transfers. They work just like our childhood tatoos that we applied with water, but these of course are with chocolate. We tried a couple methods. Our cookie molds had a raised image: LOVE. So we tried some with and without. To have a flat surface we simply put a round disk of the transfer plastic with the design on the bottom, cocobutter facing up so that it would transfer onto the hot tablespoon of chocolate that went in next.


Once the chocolate was put into each mold the pounding commenced. This ensured no air bubbles and a level top surface where the design would be imprinted.

Finally to off the mold with more chocolate and give another tapping to get the air out. Place in freezer 10 minutes until set.


Once solid, pop out onto a cookie sheet and remove the plastic backing from the transfer. Walaa, beautiful Oreo cookies for any special occasion. 


Lunch time! We liked the chocolate off our fingers and sat down to a vegetarian quinoa medley with Pear and Blue Cheese Flat bread. My bad, I forgot about dessert so baked a pumpkin pie and served with ice cream. A bit early for fall dessert, but there we are... loved every bite!


Monday, June 24, 2013

Make and Take Chocolate Dipped Strawberry Meringue Cupcakes!


Make and Take was at Pam's house this month, so we knew we were in store for some creative dessert making. Mission: Top Up Cupcakes! Yummers! Never seen one, never ate one. It was a rich and dreamy adventure! This recipe requires patients for the many steps, but it is worth it in every bite!

 1. Start by pureeing the fresh strawberry's. Leave little chunks for a beautiful texture and visual sensation.

 2. In a double broiler, whip the 1 1/2 cups sugar and 6 egg whites constantly until the candy thermometer reads 160 degrees. Test the mixture to ensure no grainy feeling in the meringue. If so keep over steam another minute.Then transfer to a mixer and beat until stiff peaks form with a nice glossy finish. The bowl should now be a slight warm, much cooler than when you started... about 8 mins.


3. Add the 3/4 pounds of butter cut into small pieces and incorporated as you go. Once all butter in the meringue, beat for 2 minutes until smooth.Now incorporate the fresh strawberry's into the meringue.


4. Fill a piping bag and build layers of the meringue on top a frozen cup cake. Use a little curl on the top for best look. Place the sheet of cupcakes in the freezer and have lunch :)


For lunch Pam made a fresh fruit salad, a chicken, orzo and roasted chickpea and cauliflower salad, and some fresh baked rolls. Delicious! To finish us off, ooooh I meant to say, for dessert, she made chocolate brownie waffles with hot fudge and ice cream. 

After our delicious lunch we retrieved the frozen cupcakes, which helps the meringue from falling off when you dip them in chocolate, we set to the task of dipping and adding sprinkles.


 These chocolate dipped mini-cupcakes pack a powerful flavor! One young man was quoted to say upon tasting them, "This is what angel poop would taste like"! Huuu, not sure about that, but we got the idea... Heavenly!

Thanks Pam for a wonderful day!

RECIPES


Summer Orzo Salad with Roasted Cauliflower and Chickpeas
Vegan, Gluten Free option; Serves 6 as a side, 3-4 as a main
Inspired by: Naturally Ella's roasted cauliflower, and taken from The Fresh Connection Blog

For the chickpeas:
2 cups cooked chickpeas, rinsed
1 tbsp olive oil
1 tbsp lemon juice
1 tsp fine grain sea salt

For the cauliflower:
1/2 large head cauliflower, cut into bite size pieces
1 tbsp olive oil
salt + pepper

For the salad:
1 1/4 cup dry orzo (I used gluten free orzo, but regular works too)
2 1/2 cups baby greens (I used a combo of arugula and baby kale)
1/4 cup sundried tomatoes, chopped
1/3 cup fresh parsley, finely chopped
3 tbsp fresh lemon juice
2 tbsp olive oil
1 1/2 tsp dijon mustard
1 clove garlic, minced
1 tsp agave or maple syrup or honey
pinch, cayenne (optional)
salt + pepper, to taste

1. Preheat your oven to 400F.  Toss chickpeas with oil, lemon juice and salt.  Arrange on a single layer on a baking sheet.  Toss cauliflower with oil and salt/pepper.  Arrange on a single layer on a separate baking sheet.  Place the chickpeas and the cauliflower in the oven.  Bake for 15 minutes.  Stir both, then bake for another 15-20 minutes, or until desired doneness.
2.  While your chickpeas and cauliflower are roasting, prepare your orzo.  Boil water in a large pot. Add orzo and stir.  Boil for about 8 minutes (or follow your package directions).
3. Whisk together the lemon juice, olive oil, mustard, garlic, syrup and cayenne pepper.  Set aside.
4.  Rinse baby greens and place in a large bowl.  Add the sundried tomatoes and parsley.
5.  Drain your orzo and add to the bowl with the greens.  Once the cauliflower and chickpeas are done, add these to the bowl as well.  Toss everything with your dressing.  Season well with salt + pepper.  Garnish with additional parsley, if desired.

Notes: This dish is delicious served warm or cold.  Kale and Arugula both hold their shape fairly well under the warm orzo and vegetables, however if you use spinach it will wilt more so I recommend adding an extra couple handfuls or waiting until the orzo, cauliflower and chickpeas have cooled slightly before adding them to the dish.


Chocolate Covered Strawberry Cupcakes taken from Smells Like Home Blog
Yield: 12-15 cupcakes
The recipe below will yield 12-15 cupcakes, enough frosting (about 5 cups) to liberally frost those cupcakes, and plenty of chocolate for coating them. All recipes can be doubled to yield enough for 24-27 cupcakes. The instructions for these cupcakes may seem a little long and somewhat daunting but I made sure to include some helpful tips. These cupcakes would be a super fun project to do with your kids (especially the dipping part), with a group of girlfriends, or by yourself if you need some baking solace, like I often do.
Ingredients
    For the cupcakes:
  • 1/4 cup + 2 tbsp unsweetened Dutch-process cocoa powder
  • 1/4 cup + 2 tbsp hot tap water
  • 1 1/2 cups all-purpose flour
  • 1/2 tsp baking soda
  • 1/2 tsp baking powder
  • rounded 1/2 tsp coarse salt
  • 12 tbsp (1 1/2 sticks) unsalted butter
  • 1 cup + 1 tbsp granulated sugar
  • 2 large eggs, at room temperature
  • 2 tsp pure vanilla extract
  • 1/2 cup sour cream (light is fine), at room temperature
  • For the strawberry Swiss meringue buttercream frosting:
  • 1 1/2 cups diced strawberries
  • 4 egg whites, at room temperature
  • 1 1/2 cups sugar
  • pinch of table salt
  • 1 1/2 cups (3 sticks) unsalted butter, cut into tablespoons, at room temperature
  • For the chocolate coating:
  • 12 oz good semi-sweet chocolate, finely chopped
  • 3 tbsp canola oil
Instructions
  1. To make the cupcakes: Preheat the oven to 350 degrees F. Line 1 1/2 standard cupcake pans with paper cupcake liners. In a small bowl, whisk together the cocoa powder and hot water until smooth; set aside. In a medium bowl, whisk the flour, baking soda, baking powder, and salt together; set aside
  2. In a medium saucepan set over medium heat, combine the butter and the sugar. Heat, stirring occasionally to combine, until the butter is melted. The butter may not fully incorporate into the mixture but that's ok. Remove the mixture from the heat and pour it into the bowl of a stand mixer fitted with a paddle attachment. Beat on medium-low speed, 4-5 minutes, until the mixture is cooled. Beat in the eggs, one at a time, mixing well after each addition. Scrape down the sides of the bowl as needed. Blend in the vanilla and then the cocoa mixture and beat until incorporated. With the mixer on low speed add in the dry ingredients in two batches, alternating with the sour cream, beating just until combined. Using a rubber spatula, scrape up the bottom of the bowl to make sure no stray streaks of flour remain - quickly mix them into the chocolate batter.
  3. With a large cookie/ice cream scoop, fill each cupcake liner about 3/4 of the way full. Overfilling the liners will cause the cupcake tops to bake onto the pan - you don't want that. Bake for 18-20 minutes or until a toothpick inserted in the center comes out clean and the cupcake is "springy" when gently pressed on the top. Allow the cupcakes to cool in the pan for 3-5 minutes, then transfer to a wire rack to cool completely.
  4. To make the strawberry Swiss meringue buttercream frosting: Puree the strawberries in a food processor until small chunks of strawberry remain and the mixture looks like jam; set aside.
  5. In the well-cleaned and dried stand mixer bowl, place the egg whites and sugar. Set the bowl over a pan of shallow water and bring the water to a simmer - the bottom of the bowl should not touch the simmering water. While the water simmers, lightly whisk the egg whites and sugar constantly. Once the mixture has reached a temperature of 160 to 165 degrees F on a candy thermometer and is completely smooth (i.e., there is no gritty sugar remaining when you rub a little of the mixture between your fingers), remove it from the heat and attach it to the stand mixer with the whisk attachment fitted. Gradually increase the speed up to medium-high, whisking until the mixture is glossy and completely cool, about 8 minutes. The bottom of the bowl will be nearly cool as well.
  6. With the mixer on medium-low, plunk the butter into the bowl two tablespoons at a time, allowing each addition to incorporate completely before adding the next two tablespoons. Scrape down the sides of the bowl and increase the speed to medium, beating until the buttercream comes together about 10 minutes. The mixture will be very loose at first and then it will curdle. Keep beating until it smooths out into a thick buttercream frosting. Once this happens, switch to the paddle attachment and mix the frosting on low speed for 2 minutes to release any air bubbles. Gradually stir in the strawberry puree until thoroughly combined.
  7. To make the chocolate coating: Add the finely chopped chocolate and canola oil to a medium bowl and set the bowl over a small pan of shallow water. Bring the water to a simmer - the bottom of the bowl should not touch the simmering water. Stir the chocolate and oil together while the water simmers until the chocolate is completely melted. Alternatively, you can melt the chocolate and oil together in the microwave for 30 second intervals, stirring after each interval. Pour the chocolate into a wide and short cup (mine was 12 oz, about 3 1/2" wide by 3" tall). The cup should be wide enough so that you can dip the cupcake inside without rubbing against the sides - check the cup size before you pour the chocolate in! Allow the chocolate to cool for 15 minutes.
  8. To frost and dip the cupcakes: Transfer the frosting to a disposable piping bag fitted with a large pastry tip (I used Ateco 809) or a zip-top bag with a corner snipped off and a pastry tip slipped in the corner. Pipe the frosting onto the cupcakes in large stacking swirls. Be sure to press the first swirl of frosting somewhat into the cupcake to make sure it sticks to the cupcake - this is important when you go dip the frosting into the chocolate coating as you don't want the frosting falling off into the chocolate. Set the cupcakes on to a wire rack with a piece of parchment or wax paper or aluminum foil underneath the rack.
  9. Take a cupcake, turn it up-side-down, and steadily dip it down into the chocolate up to the point with the frosting meets the cupcake. Pull it straight out of the chocolate, allowing the extra chocolate to drip off into the cup. Turn the cupcake right-side-up and place it on the wire rack. The frosting should be completely covered with chocolate but if any shows, use a knife to drizzle some chocolate into the spots where the frosting shows. Repeat with remaining cupcakes. Allow the chocolate coating to set-up - this can be done at room temperature or in the fridge for 15 minutes. Store finished cupcakes in an airtight container at room temperature for 2-3 days.
Notes
source: cupcakes adapted from these chocolate cupcakes, strawberry Swiss meringue buttercream adapted from Martha Stewart Cupcakes via Pink Parsley, chocolate coating adapted from Martha Stewart


Wednesday, May 8, 2013

May Make & Take in the Sun!


 It has been a long 5 months since the Make & Take Gals gathered to share in our shared passion of learning and creating. Lives are changing and we all seem to be on the move into a new phase of life where jobs, reinvention, travel, and weddings are pulling us from the steady hummm of growing families to reengaging with husbands and life in new ways. When we gathered around Jean's table this month, it was sweet and inspiring. Catching up on life events and telling stories of dreams and hopes. Life is on the move for the 4 of us but when we are together, the magic still unfolds in our support and care of each other.

This month Jean hosted a wonderful outdoor lunch on a 70+ degree day here in Portland. We sipped Strawberry Honey Lime Spritzers while the scent of wisteria and lilacs enveloped our gathering. Jean made a stunning Quinoa Salad, Cucumber Salad and nan that had all of us demanding recipes. Each unique and guaranteed bring satisfaction to your family table. She then unveiled her, from scratch and gluten free, Almond Joy Brownies, 
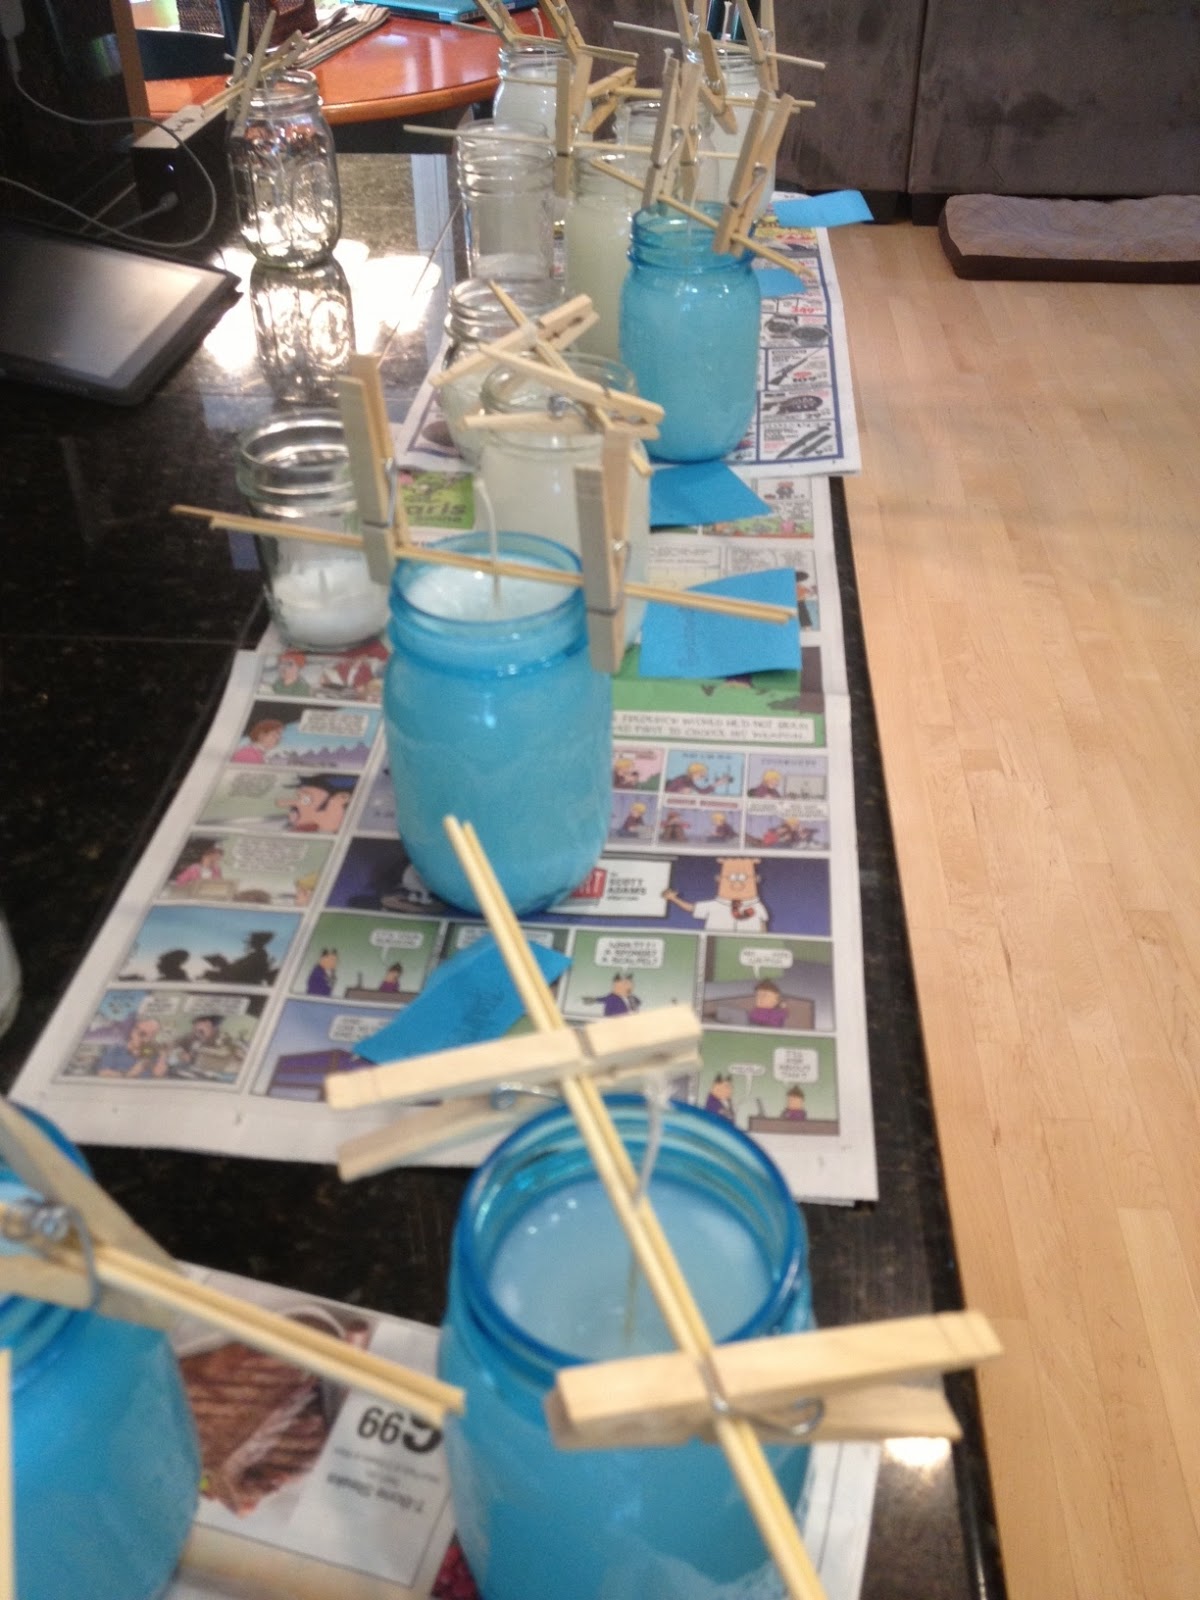
Buckeye Brownies and Rhubarb Crumble Bars. Sated we made our best effort to wrap up our work on the Ball Jar Candles and darling cards we were making.


 RECIPES


Crunchy Cashew Thai Quinoa Salad with Ginger Peanut Dressing {vegan, gluten-free

Ingredients
                          ¾ cup uncooked quinoa
                          1-2 cups shredded red cabbage, depending on how much crunch you like
                          1 red bell pepper, diced
                          ½ red onion, diced
                          1 cup shredded carrots
                          ½ cup chopped cilantro
                          ¼ cup diced green onions
                          ½ cup cashew halves or peanuts (honey-roasted is good)
                          Optional: 1 cup edamame or chickpeas
                          Fresh lime, for a bit of tang
                          For the dressing:
                          ¼ cup all natural peanut butter
                          2 teaspoons freshly grated ginger
                          3 tablespoon soy sauce, gluten-free if desired
                          1 tablespoon honey (use agave if vegan)
                          1 tablespoon red wine vinegar
                          1 teaspoon sesame oil
                          1 teaspoon olive oil
                          Water to thin, if necessary
   
Instructions
1. To cook quinoa: Rinse quinoa with cold water in mesh strainer. In a medium saucepan, bring 1 ½ cups of water to a boil. Add in quinoa and bring mixture to a boil. Cover, reduce heat to low and let simmer for 15 minutes or until quinoa has absorbed all of the water. Remove from heat and fluff quinoa with fork; place in large bowl and set aside to cool for about 10 minutes. You should have a little over 2 cups of quinoa.
2. To make dressing: Add peanut butter and honey or agave to a medium microwave safe bowl; heat in microwave for 20 seconds. Add in ginger, soy sauce, vinegar, and both sesame and olive oil and stir until mixture is smooth and creamy. If you want a thinner dressing, simply stir in a teaspoon or two of water or olive oil.
3. Add as much or as little dressing as you’d like to the quinoa. I always start out with a little bit of dressing and usually add more to suit my taste preferences. Alternatively you can save the dressing for later and add when you are ready to eat; however the flavors of the dressing usually soak into the salad so I love adding it to the quinoa first.
4. Next fold in red pepper, onion, cabbage, carrots, and cilantro into the quinoa. Garnish with cashews and green onions. Serve chilled or at room temperature with lime wedges if desired.
Nutrition Information
Serving size: 1/6th of recipe Calories: 260 Fat: 13.5g Carbohydrates: 27.7g Sugar: 7g Fiber: 4.3g Protein: 8.6g

Sweet and Sour Cucumber Salad

INGREDIENTS
2 English (or regular) cucumbers (1 1/2 pounds total), unpeeled, very thinly sliced
1 tablespoon coarse kosher salt
1/2 cup distilled white vinegar
1/4 cup finely chopped fresh dill
3 tablespoons sugar
1/2 teaspoon freshly ground black pepper
DIRECTIONS
Makes 6 to 8 servings.
1.Place cucumber slices in colander. Sprinkle with salt; toss to coat. Let stand 15 minutes, stirring occasionally.
2.Meanwhile, for dressing, stir vinegar, dill, sugar, and pepper in large bowl until sugar is dissolved.
Drain cucumbers well; pat dry. Add cucumbers to dressing and stir to blend.

Strawberry, Honey & Lime Spritzer
Ingredients 

                          Strawberry Honey & Lime Puree
                          1 lb of ripe strawberries, washed and chopped
                          1/4 cup of raw honey
                          Zest from 1 lime
                         
                          Strawberry Honey & Lime Sptrizer
                          1/4 cup Strawberry Honey & Lime Puree (more if you like your drink sweet!)
                          Juice from 1/2 a lime (optional)
                          1.5 ounces of vodka (optional) – I substituted frozen lemonade concentrate
                          Sparkling water
                          Ice
                          Lime wedge to garnish
                         
Instructions
1.  Wash and chop all of your strawberries, then set them aside in a heatproof bowl.
2.  Measure out your raw honey and add it to a small sauce pan with your lime zest. Heat your honey over low heat until the mixture starts to bubble. Allow it to bubble for 1 to 2 minutes while stirring and then remove it from the heat.
3.  Pour the hot honey and lime syrup over your strawberries and stir together until all of your strawberries are coated. Allow this mixture to sit for at least 20 minutes. Your strawberries will start to absorb the liquid and become soft and syrupy.
4.  Once the strawberries are done, you can add them to a blender. Blend together until a puree forms. This will only take 30 seconds or so.
5.  To assemble your cocktail you will need a glass full of ice, half of a lime and your shot of vodka. You will also need your sparkling water. I simply used water made with my soda stream, but you can use tonic water if that is what you have on hand. Pour your puree into the bottom of the glass over your ice cubes. Now add your shot of vodka. If you like your drink to be a little on the tart side you can add the juice from 1/2 of a lime. Fill the remainder of your glass with sparkling water and stir.
6.  If you are planning on making these non-alcoholic, omit the vodka, but repeat all of the other steps.( I suspect that this would also we very good with a little bit of lemonade in the mix.)
Garnish with a fresh lime wedge and enjoy!

Buckeye Brownies
Ingredients:
    Brownies (see recipe below)
    2 c. powdered sugar
    1/2 c. plus 6 T. butter, softened and divided
    8-oz. jar creamy peanut butter
    6-oz. pkg. semi-sweet chocolate chips
Instructions:
Prepare and bake brownie recipe below. Let cool. Mix powdered sugar, 1/2 cup butter and peanut butter. Mix well and spread over cooled brownies. Chill for one hour. Melt together chocolate chips and remaining butter in a saucepan over low heat, stirring occasionally. Spread over brownies. Let cool; cut into squares. Makes 2 to 3 dozen.

Almond Joy Brownies
Prepare and bake brownie recipe (below) and allow to cool.    Mix all ingredients for filling except almonds.  Spread on top of cooled brownies.  Chill until coconut is firm.  Melt chocolate chips and butter in a saucepan over low heat.  Allow to cool slightly .  Cut brownies into squares and top with a whole almond.  Cover each brownie with chocolate sauce, allowing it to drip over the sides.  Cool.
Ingredients for filling and Chocolate Sauce:
  5 fl oz sweetened condensed milk
  1 tsp vanilla extract
  1/4 tsp salt
  2 cups powdered sugar
  14 ounces shredded sweetened coconut
  3/4 cup whole toasted almonds
Chocoate Sauce:
  9 oz semi-sweet chocolate chips
  9 Tbsp butter

Brownies – modified from Good Housekeeping

4 oz unsweetened chocolate
2 sticks (1 cup) butter
2 cups sugar
4 eggs
1 cup flour
1 tsp vanilla
½ tsp salt
1 package (12 oz) dark chocolate chips
Preheat oven to 350, grease a 9 x 13 pan. In a saucepan over low heat, melt chocolate and butter, stirring constantly.  Remove from heat and add sugar.  Let cool slightly.  Add eggs, one at a time, whisking until blended after each egg.   Add flour, vanilla, and salt.  Add in chocolate chips.  Pour into pan, bake 30 minutes.
Thank you Jean for a wonderful reunion!